
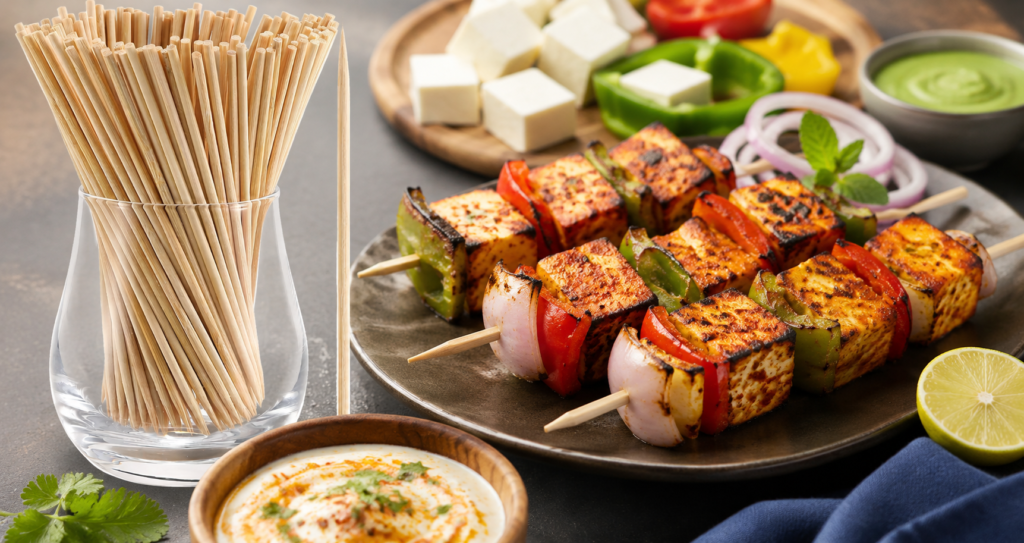
Let’s be honest — ordering paneer tikka from a restaurant and making it at home are two very different experiences. Most home attempts end up with soft, pale cubes sitting in a puddle of their own water, nothing like the charred, smoky, slightly crispy pieces you get from a proper tandoor.
But here’s the thing: it’s not the tandoor that makes paneer tikka great. It’s everything that happens before the heat. The marination, the moisture control, the skewering technique, and a few small choices you make along the way. Get those right and you can make restaurant-quality paneer tikka at home — whether you’re using a grill, an oven, or even a tawa.
This guide covers all of it, from choosing the right paneer to the often-ignored skewer details that actually matter more than most recipes admit.
Start With the Right Paneer
This is where most recipes skip a crucial detail. Not all paneer behaves the same way on heat.
Freshly made paneer that’s still a bit soft and crumbly will fall apart on skewers and release too much water during cooking. Paneer that’s too old gets rubbery. What you want is firm, cold paneer — the kind that holds its shape when you press it, doesn’t crumble at the edges, and cuts into clean cubes.
If you’re buying from a store, take it straight from the fridge. Don’t let it sit at room temperature before you cut and marinate it. Cold paneer stays together much better on the skewer and absorbs the marinade without turning mushy.
Cut the paneer into cubes around 3–4 cm in size. Too small and they’ll dry out quickly. Too large and the inside won’t heat through properly before the outside chars.
One more thing people miss: after cutting the cubes, pat them dry with a kitchen towel. Paneer naturally holds a fair amount of moisture, and that moisture is the enemy of a good tikka. A dry surface allows the marinade to cling better and gives you that golden-brown exterior instead of a steamed one.
The Marinade — Two Layers, Not One
Most recipes give you a single-step marinade. The best paneer tikka uses two.
First marinade (15–20 minutes):
- 1 tsp ginger-garlic paste
- 1 tsp lemon juice
- ½ tsp salt
Mix this together, rub it into your paneer cubes, and let it sit for 15–20 minutes. This first layer seasons the paneer from within and helps the surface dry out a little more, which prepares it for the second coat.
Second marinade (at least 2–3 hours, overnight if possible):
- 4–5 tbsp thick hung curd (this is non-negotiable — regular curd is too thin)
- 1½ tsp red chilli powder (use Kashmiri chilli for colour without too much heat)
- 1 tsp cumin powder
- 1 tsp coriander powder
- ½ tsp turmeric
- ½ tsp garam masala
- 1 tsp chaat masala
- 1 tsp kasoori methi (crushed between your palms)
- 2 tbsp mustard oil or any neutral oil
- Salt to taste
- A pinch of besan (chickpea flour) — about 1 tsp
That last ingredient, the besan, is what takes most home cooks by surprise. It acts as a binder, helping the marinade stick to the paneer and creating a very thin coating that crisps beautifully on the outside. Just a teaspoon is enough — too much and it starts tasting like pakoda batter.
On the hung curd: if you’re using regular dahi, pour it into a muslin cloth or a clean cotton cloth and hang it over the sink or a bowl for at least an hour. You want something thick enough that it barely drips. The thicker the curd, the better the marinade coats and holds.
Coat your paneer, cover and refrigerate for at least two to three hours. If you’re making this for dinner, mixing the second marinade the previous night is the single best thing you can do.
The Vegetables
Paneer tikka isn’t just paneer — the vegetables in between are part of what makes it proper tikka, and they’re worth some attention.
The classic combination is onion (cut into squares and layers separated), green or yellow capsicum (cut to match the paneer size), and tomato (deseeded and cut into squares — remove the watery pulp or it’ll fall apart).
Add these vegetables to the same marinade bowl as the paneer for the last 30 to 45 minutes. Don’t marinate vegetables as long as the paneer — they’re softer and absorb more quickly. If you leave capsicum overnight in marinade it can go limp.
The Skewer Question — This Matters More Than You Think
Here’s the part most home-cook recipes gloss over: skewers make a real difference to how your tikka turns out, and it’s not just about what to thread the food onto.
Flat vs. round skewers
Round skewers are the most common — they’re cheap, widely available, and completely wrong for paneer tikka. When the skewer is round, the food can spin on it. What that means practically is that one side keeps falling back to face down, one side cooks, and you get uneven char.
Flat metal skewers prevent this because the food stays in place when you turn the skewer. This is what professional tandoor cooks use, and it’s the reason restaurant tikka has that even colour on all sides.
If you only have round skewers, thread the food on two skewers side by side, about a centimetre apart. It prevents spinning and gives you much better results.
Bamboo vs. metal skewers for home cooking
For oven or tawa cooking, bamboo skewers work, but you must soak them in water for at least 30 minutes before using them, otherwise the ends burn and can catch flame. Even with soaking, bamboo isn’t ideal if you’re grilling at high heat for long.
Metal skewers, on the other hand, conduct heat from the inside of the food out — which actually helps the paneer cook through more evenly. They’re also reusable, don’t char, and are much easier to clean. If you’re serious about making tikka more than once or twice a year, a set of good stainless steel skewers is a worthwhile purchase.
How to thread the skewer properly
Don’t cram food tightly together. Leave a small gap — about half a centimetre — between each piece. This allows heat and airflow to reach all sides. The pattern should go: paneer → capsicum → onion layer → paneer → tomato → and so on.
Don’t push the first piece all the way to the pointed tip. Leave a little gap so the food doesn’t touch the grill grate or oven rack directly, which can cause sticking.
Cooking Methods at Home
In the Oven (Most Consistent Results)
Preheat your oven to 220–230°C (top and bottom heat). Line a baking tray with foil and place the skewers across the tray so the paneer is suspended slightly above the surface — not lying flat on the foil.
Cook for 12–15 minutes, turn the skewers, then switch to grill/broil mode for the final 5 minutes. That last blast of top heat is what gives you the charred edges. Brush a tiny bit of butter or oil on the tikka just before you switch to grill mode.
On a Gas Flame (Most Flavour)
For a proper char and slight smokiness, cook the threaded skewers directly over a medium-high gas flame. Hold the skewer and rotate it slowly, letting each side get colour before moving to the next. Keep it moving — you’re looking for dark spots, not burnt black. This method takes about 8–10 minutes and gives the most authentic flavour.
On a Grill Pan or Tawa
If you have a cast iron grill pan, heat it until it’s very hot, brush lightly with oil, and lay the skewers across it. Press gently with a spatula once so the paneer makes contact with the ridges. Turn every 2–3 minutes. This method doesn’t give smokiness, but the grill marks and char are quite good.
In an Air Fryer
Preheat to 200°C. Place the skewers in the basket and cook for 10–12 minutes, flipping halfway. Brush with a little butter at the halfway point. The air fryer actually does a surprisingly good job — the circulating heat dries the exterior nicely without drying out the inside.
What to Do After It Comes Off the Heat
One small step that makes a noticeable difference: as soon as the tikka comes off the heat, squeeze fresh lemon juice over it immediately and dust with chaat masala. Do this while it’s still hot so the flavours absorb.
Let it rest for two to three minutes before serving — not too long, but just enough that the juices settle slightly.
Serve with sliced onion rings sprinkled with chaat masala and lemon, a fresh green chutney, and some roomali roti or laccha paratha if you’re going all in.
Common Mistakes and How to Avoid Them
The tikka is watery: The curd wasn’t thick enough, or the paneer wasn’t patted dry before marinating. Fix this by always using hung curd and drying the paneer cubes.
The paneer is falling off the skewer: You’re cutting too small, the paneer is too fresh and soft, or it wasn’t cold when threaded. Use refrigerator-cold, firm paneer and cut in larger cubes.
The outside is cooked but the inside is cold: The heat was too high too fast. Cook at 200–220°C steadily rather than blasting it at maximum heat.
No char or colour: The marinade is too wet, or the oven temperature isn’t high enough. Squeeze out excess marinade before threading, and use the grill/broil function for the final few minutes.
Everything tastes flat: You skipped the first marinade, or you didn’t use enough salt or chaat masala at the end. The final dusting of chaat masala and lemon juice is not decorative — it’s essential.
A Note on Measuring Your Marinade Ingredients
Getting paneer tikka right is partly intuition and partly accuracy — especially with the spices. If you’re making this for the first time, it helps to measure properly so you can taste, adjust, and then remember exactly what worked.
Using proper measuring spoons (rather than guessing with a random kitchen spoon) makes a real difference, particularly with things like Kashmiri chilli powder, which can vary a lot in heat and colour intensity depending on the brand. A measured teaspoon versus a heaped tablespoon is a very different tikka.
Final Thoughts
Perfect paneer tikka at home is absolutely achievable — it just requires taking a few steps seriously that most recipes treat as optional. The double marinade, dry paneer, flat skewers, proper heat, and that final lemon-and-chaat-masala finish. None of these are complicated. They’re just deliberate.
Make it once with this method and you’ll adjust it to your taste the second time — a little more chilli, a little less curd, an extra squeeze of lime. That’s the real reward of cooking this at home: it becomes yours.
Looking for the right kitchen tools? Head to Homepixi.com to explore our range of home and kitchen essentials — from precision measuring tools to kitchen accessories built for everyday Indian cooking.
faq’s
Yes. If you don’t have skewers, arrange the marinated paneer and vegetables on a wire rack or a foil-lined baking tray with some space between each piece. You won’t get the same suspended cooking effect, but the result is still very good — especially if you use the grill/broil function at the end for char.
Two main reasons: the curd was too thin (use hung curd only), and the paneer wasn’t dried before marinating. Always pat your paneer cubes dry with a kitchen towel before applying the first marinade. Excess moisture is the biggest reason tikka turns out soggy instead of charred.
The minimum is 2–3 hours for the second marinade. But if you have time, overnight in the fridge is ideal. The longer the paneer sits in the spiced curd mixture, the deeper the flavour goes. Just don’t marinate vegetables overnight — add them to the marinade only 30–45 minutes before cooking.
Regular curd has too much water in it. When it hits heat, the water releases and steams the paneer instead of crisping it. If you don’t have hung curd ready, pour regular dahi into a clean muslin cloth and let it drain over a bowl for at least an hour. That’s your hung curd.