
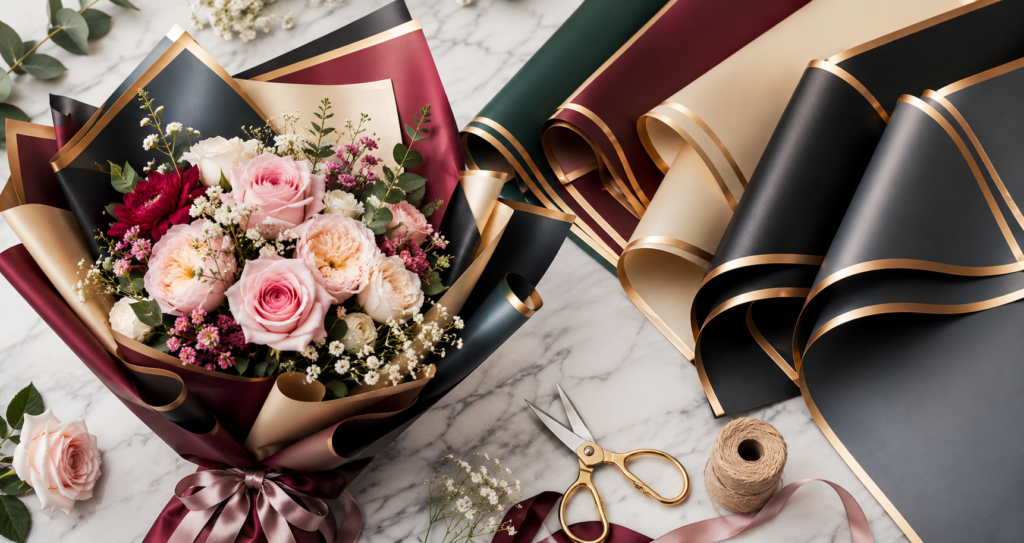
Bouquet Wrapping Sheets are the secret behind that beautifully wrapped bouquet that feels like it came with training. The way the paper fans out just right, the stems align perfectly, the ribbon curls at the end without looking forced – it all seems like the kind of thing only florists know how to do.
The truth is, it’s not that mysterious. Florists follow a method – and the right wrapping sheets make it far easier to pull off. Once you know the method, wrapping a bouquet at home starts to feel less like a craft project and more like something you can do in ten minutes before heading out the door.
Whether you’re putting together flowers from your garden, picking up a bunch from the local market on the way to someone’s home, or styling a bouquet for a birthday or anniversary – this guide walks you through exactly how it’s done, using Bouquet Wrapping Sheets to get that clean, professional finish. No guesswork, no fumbling with tape at the last minute.
What You’ll Need: Bouquet Wrapping Sheets and a Few Other Basics
You don’t need to spend a lot to wrap a bouquet well. Most of what makes a florist’s wrap look professional isn’t the materials — it’s the technique.
Here’s what to gather before you begin:
For the wrap itself:
- Kraft paper or brown paper (the most forgiving for beginners)
- Tissue paper (for a softer, layered effect)
- Cellophane / OPP wrap (for a glossy, gift-shop finish)
- Or a combination of two — tissue paper on the inside, kraft paper on the outside
For finishing:
- Ribbon (satin, jute, or raffia — all work well depending on the occasion)
- Floral tape or regular tape
- A rubber band (you’ll need this temporarily while arranging)
- A good pair of scissors — sharp ones, not the dull craft scissors that have been in your drawer for five years
For the flowers:
- Fresh flowers from a market, supermarket, or your garden
- A bucket of water to keep them in while you work
One thing that truly makes a difference here is having a sharp, clean pair of scissors. Trying to cut ribbon or paper with blunt scissors results in jagged edges that undo all the work you put into the wrap. The same scissors you’d use to cut herbs cleanly in the kitchen — the kind with proper stainless steel blades — are exactly what you need here.
Step 1: Prepare Your Flowers First
Before any wrapping happens, spend time with the flowers. This is the step most people skip when they’re in a hurry, and it’s the one that matters most for how the final bouquet looks and lasts.
Remove all the leaves from the lower half of each stem — any leaf that would sit inside the wrap or near the water tends to rot quickly and creates that unpleasant smell even in fresh flowers. Strip them off cleanly.
Cut the stems at an angle, not straight across. A diagonal cut increases the surface area of the stem and allows the flower to draw up more water. Use a sharp blade for this — a clean cut, not a crushed one — and do it while holding the stems underwater if possible (a bucket or a deep bowl works fine). This prevents air bubbles from entering the stem and blocking water absorption.
Arrange your flowers loosely in one hand before you commit to any wrap. This is called building the spiral — you add each stem at a slight angle, rotating the bunch in your palm as you go. The goal is a dome shape at the top with all the stems crossing at a single point in the middle.
Once you’re happy with the shape, secure the stems with a rubber band at that crossing point. Just tight enough to hold — you’ll remove or cover this later.
Step 2: Choose Your Paper and Cut It to Size
For a single-layer kraft paper wrap, cut a square roughly 50–60 cm on each side for a standard bouquet. Too small and you won’t have enough paper to fold and secure properly. Too large and the wrap overwhelms the flowers.
For a two-layer wrap (tissue paper inside, kraft outside), cut the tissue paper slightly smaller than the outer paper — about 40 cm square — and lay it centred on top of the kraft paper before you place the flowers.
If you’re using cellophane, cut it larger than paper — at least 60–70 cm — because it doesn’t fold and hold as naturally as paper does.
The diagonal trick: Instead of laying the paper flat like a square, rotate it 45 degrees so it sits like a diamond in front of you. This gives you two corners to work with on the sides and enough length at the top and bottom to properly encase the bouquet. Professional florists almost always work with paper positioned this way.
Step 3: Place the Flowers on the Paper
Lay your bouquet diagonally across the paper with the flower heads pointing toward the upper corner of the diamond and the stems pointing toward the lower corner.
The flowers should sit about one-third down from the top edge of the paper. If they sit too high, you won’t have enough paper to fan around the sides. Too low and the wrap won’t cover enough of the stems to look neat.
Step 4: Wrap the Sides
This is the step where most home-wrapping goes wrong — and it’s actually the simplest thing once you understand what you’re trying to do.
Take the left corner of the paper and fold it up and over the bouquet, angling it so it sits just below the flower heads. Hold it in place with your thumb.
Take the right corner and do the same — fold it up and across, overlapping slightly with the left side. You’re creating a cone shape around the flowers.
The paper should be snug around the stems but open and fanning out around the flower heads. That flared, open top is what makes a florist-wrapped bouquet look professional. If the paper is pinched tightly around the flowers, they look trapped. Let them breathe at the top.
Hold the folded paper at the stem area and use floral tape or a piece of regular tape to secure where the two sides overlap. Just one or two pieces is enough — you don’t need to tape the whole thing.
Step 5: Secure and Tie the Ribbon
Cut a piece of ribbon about 60–80 cm long. Wrap it around the stems at the point where the paper starts — this is usually about 10–12 cm above the bottom of the stems. Tie a firm knot first, then tie a bow on top of the knot.
If you want curled ribbon (the kind that springs into a spiral), hold the ribbon taut and run the flat edge of your scissors firmly along the length of it in one fast stroke. Don’t press too hard or the ribbon tears — medium pressure and a confident pull is all it takes. Satin ribbon curls much more easily than thick grosgrain or jute.
For a minimalist look, skip the bow and tie jute twine in a simple knot. For a rustic or garden bouquet, raffia tied in a loose bow looks beautiful and natural.
Step 6: Trim the Stems Evenly
Once the bouquet is fully wrapped, look at the stems poking out from the bottom. If they’re uneven (which they almost always are at this point), trim them to the same length with one clean cut. This is a small detail but it changes the overall look completely. Uneven stems make even a well-wrapped bouquet look unfinished.
Cut straight across for even stems, or angle the cut slightly if you prefer — either works, but straight looks cleaner when the bouquet is standing in a vase.
Paper Combinations That Work Really Well
For birthdays and celebrations: Tissue paper in a soft colour (blush pink, sky blue, mint) as the inner layer, with white or cream kraft paper as the outer wrap. Tie with a satin ribbon in a matching colour.
For a rustic or garden party look: A single layer of brown kraft paper, stems left slightly longer, tied with natural jute twine. No tissue paper, no cellophane. Let the flowers do the work.
For a formal gift (wedding, anniversary): White tissue paper layered with semi-transparent cellophane on the outside. The flowers are visible through the cellophane while still feeling wrapped and special. Tie with a wide satin ribbon and add a small tag.
For monsoon or outdoor gifting: Use cellophane as the outer layer — it protects the flowers from moisture and keeps the bouquet looking fresh even if it rains lightly. Layer tissue paper inside for softness.
Common Mistakes and How to Fix Them
The paper keeps unrolling: You’re not starting the fold tightly enough. Fold the first side firmly against the stems before bringing the second side over.
The bouquet looks lopsided: The flowers weren’t arranged in a spiral before wrapping. Go back to the building stage and add each stem at a diagonal to the last.
The ribbon won’t stay tied: You’re tying the bow before the knot is tight enough. Always tie a firm, flat knot first — two overhand knots — and then add the bow loops on top.
The paper is tearing when I fold it: The paper is too thin or too dry. Tissue paper especially can tear at corners when pulled. Work slowly and fold gently rather than pulling the corners sharply.
It looks nothing like a florist’s bouquet: The most common reason is too little paper at the top. The paper should flare outward at the top to frame the flowers — if it’s straight or tucked in, open it out with your fingers from the inside.
A Few Things Worth Knowing About Flower Care Inside the Wrap
A wrapped bouquet is meant to be gifted, not kept wrapped for days. Once the person receives it, the wrap should come off and the flowers should go straight into a vase with fresh water.
If you’re wrapping ahead of time and the bouquet needs to sit for a few hours, wrap a damp paper towel around the cut end of the stems before the paper goes on. This keeps the flowers hydrated without wetting the paper itself.
Keep the wrapped bouquet in a cool spot — not in direct sunlight or near a heater. Flowers wilt dramatically faster in heat, especially once they’re out of water.
Wrapping for Different Occasions
For a birthday: Go for bold — a mix of colours, a bright ribbon, maybe a small card tucked into the wrap at the top.
For a condolence or sympathy bouquet: Keep it simple and white or soft. Single-variety flowers like white lilies or chrysanthemums in plain white tissue paper, tied with a thin white ribbon. Understated is the right call here.
For a festive occasion (Diwali, housewarming): Marigolds, tuberoses, and gerberas in orange and yellow wrapped in golden cellophane with a red or gold ribbon feel festive and warm. You can find these at any local phool bazaar.
For a thank-you gift: A tight, compact posy of mixed garden flowers in a single colour wrapped in brown kraft paper with a handwritten tag feels personal and thoughtful without trying too hard.
Final Thoughts
Wrapping a bouquet well isn’t about expensive paper or professional tools. It’s about understanding a few simple steps — spiral the stems, position the flowers on the diagonal, let the paper flare at the top, tie the knot before the bow — and then practicing until it becomes easy.
The first time might take you fifteen minutes and look a bit off. The second time will be faster and better. By the third, it’ll start to feel natural.
Fresh flowers are one of the most generous things you can give someone. A bouquet wrapped with care and intention says something that a store-bought arrangement in plastic wrap simply doesn’t. Once you’ve done this yourself, you’ll never go back to handing someone a bunch still in its grocery store sleeve.
Find quality kitchen and home tools at Homepixi.com — including sharp, durable stainless steel kitchen scissors and accessories that work just as well for home crafts as they do for everyday cooking.
faq’s
Kraft paper is the best starting point for beginners — it’s sturdy, easy to fold, holds its shape well, and looks beautiful without any extra effort. For a softer, more gift-like finish, layer tissue paper inside and kraft paper outside. If you want a glossy florist-style look, cellophane or OPP wrap works best and has the added benefit of protecting flowers from moisture. The paper you choose should match the occasion — rustic and casual calls for kraft, formal or romantic calls for tissue and cellophane together.
The biggest mistake people make is wrapping flowers and then leaving them sitting out in a warm room. Once wrapped, wrap a damp paper towel around the cut ends of the stems and keep the bouquet in a cool, shaded spot away from direct sunlight and fans. If you’re wrapping several hours in advance, re-cut the stems at a diagonal just before the recipient puts them in a vase — this opens up the stem again and helps the flowers drink water properly. Unwrap the bouquet as soon as it reaches its destination and place the flowers in fresh water immediately.
For a standard bouquet of 10–15 stems, cut your paper into a square of roughly 50–60 cm on each side. Position it like a diamond (rotated 45 degrees) rather than a flat square — this gives you more coverage around the sides and enough length at the top to fan outward around the flower heads. If you’re doing a two-layer wrap with tissue paper inside, cut the tissue paper slightly smaller at around 40 cm so it sits centred within the outer paper. Always cut a little more than you think you need — you can fold excess inward, but you can’t add paper back once it’s cut too short.
Yes — and sometimes a ribbon-free wrap actually looks more elegant. Instead of tape, fold the paper tightly at the stem area and tie it with jute twine, raffia, or even a thick rubber band covered by twine. The fold itself holds the paper in place if done snugly enough. For a completely minimal look, fold the paper into a cone shape around the stems and tuck the excess inward at the bottom — no tape, no ribbon needed. This works especially well with kraft paper, which is stiff enough to hold a fold without springing open.