
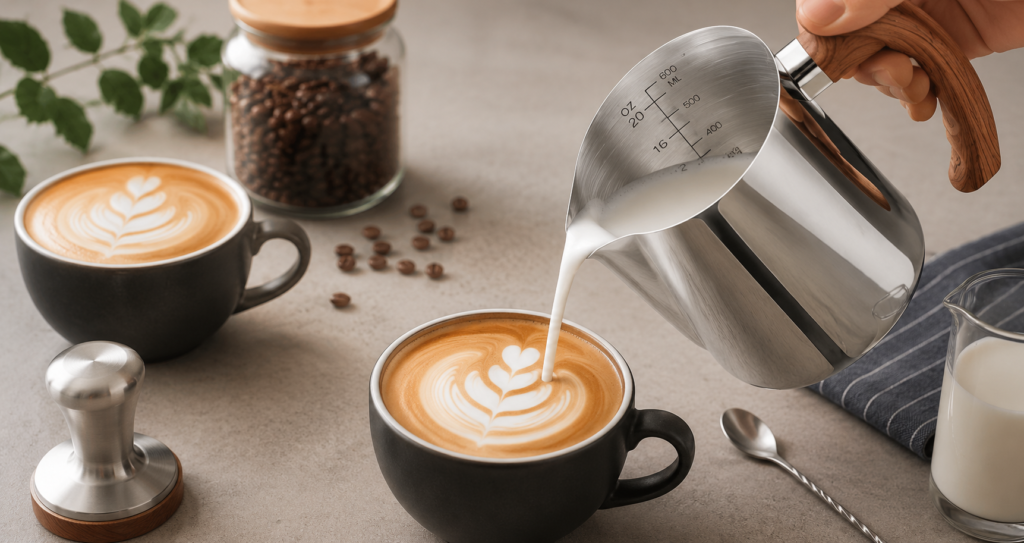
Most people assume latte art is one of those things only trained baristas can do — something that requires years behind an espresso machine and a natural steadiness in the hand that most of us simply don’t have.
The truth is a bit more forgiving than that.
Yes, latte art takes practice. The first few attempts will look nothing like the heart or the rosette you had in mind. But the gap between a home coffee drinker and someone pulling off clean latte art is much smaller than it looks — and the main thing standing between you and a decent design isn’t skill. It’s having the right equipment and understanding a few things about how milk actually behaves.
This guide walks you through everything: the milk, the technique, the pitcher, and the actual pouring. If you’ve got an espresso machine or a stovetop moka pot at home and a milk frothing pitcher, you have everything you need to start.
Why the Pitcher Matters More Than Most People Realise
Before we get into technique, let’s talk about the tool at the centre of all of this — the milk frothing pitcher.
A lot of home coffee setups skip the pitcher entirely and use a handheld frother or just heat milk in a pan. These approaches can give you frothy milk, but they rarely give you the silky, pourable microfoam you need for latte art. The reason is control — specifically, control over the angle, speed, and direction of the pour.
A proper frothing pitcher solves this with its shape. The narrow, angled spout channels the flow of milk into a thin, directed stream that you can position precisely on the surface of your espresso. Without a proper spout, you’re essentially pouring milk — with one, you’re drawing with it.
The Homepixi Milk Frothing Pitcher is made from 304 food-grade stainless steel, which matters for a couple of reasons. Steel conducts heat in a way that lets you feel the temperature of the milk through the metal with your palm as you steam — something you can’t do with a plastic jug. It also comes with engraved measurement markings on the inside (engraved, not printed, so they never fade with washing) and a precision spout designed for exactly this kind of controlled pour. It comes in two sizes — 350ml and 600ml — which covers everything from a single espresso drink to a large cappuccino for two.
The 600ml size is ideal if you’re making lattes regularly, as it gives you enough room to properly swirl and aerate the milk without it spilling over the edge. The 350ml works better for a single strong cappuccino where you want a denser, tighter foam.
Understanding Microfoam — The Foundation of Latte Art
Before you can pour latte art, you need the right milk texture. This is called microfoam, and it’s different from the thick, bubbly foam you get on a cappuccino or the flat steamed milk you’d get from just heating milk in a pot.
Microfoam is smooth, glossy, and has a consistency close to wet paint or melted ice cream. When you tap the pitcher and swirl it, the surface should look like it has a subtle sheen — not large visible bubbles, and not completely flat either. It should be pourable and move fluidly when you tilt the pitcher.
What you’re trying to avoid:
- Large bubbles on the surface (the foam is too stiff and airy)
- Completely flat, thin milk with no body (under-frothed)
- Separated layers where froth sits on top and watery milk is below
Getting to microfoam consistently takes a bit of repetition, but once you can recognise it by sight and feel, the pouring part becomes much more achievable.
Which Milk Works Best for Latte Art?
Full-fat dairy milk is the most forgiving and gives the best microfoam for latte art. The fat content stabilises the foam and gives it that smooth, glossy texture. Whole milk (also called full-cream milk) is what most café baristas use.
Toned milk (3% fat, standard in Indian households) works reasonably well and is what most people will be using at home — the microfoam is slightly less thick but still pourable for basic designs.
Double-toned or skim milk is harder to work with for latte art because it produces lighter, less stable foam that doesn’t hold patterns well.
Plant-based milks: Oat milk is by far the best non-dairy option for latte art — several oat milk brands are specifically formulated for barista use and produce surprisingly good microfoam. Almond milk can work but tends to separate. Soy milk can froth well but has a distinct taste that doesn’t suit all coffees.
For your first few attempts, stick to full-fat dairy. Once you understand what the foam should feel and look like, you can experiment with alternatives.
Step 1: Pull Your Espresso First
Latte art requires espresso as the base — not filter coffee, not instant, and not French press. The thick, concentrated shot creates a dark canvas with a layer of golden crema on top that the milk foam can float on and blend with as you pour.
If you have an espresso machine at home, pull a double shot (about 60ml) directly into your cup. The crema should be thick, reddish-brown, and cover the surface of the shot.
If you don’t have an espresso machine, a stovetop moka pot is a workable alternative — it doesn’t produce true espresso pressure but gives a strong, concentrated coffee that can support basic latte art. The crema will be minimal, but simple designs like a heart are still achievable.
Use a preheated cup — pour a little hot water in, swirl it, and tip it out before adding the espresso. A cold cup causes the milk to cool too quickly and changes how the foam behaves on the surface.
Step 2: Steam and Froth the Milk
Pour cold milk into your Homepixi pitcher. The measurement markings inside make this straightforward — for a standard latte in a 250ml cup, you want around 150–180ml of cold milk. Cold milk gives you more time to work before it overheats.
Using a steam wand (espresso machine):
Submerge the tip of the steam wand just below the surface of the milk — about 1 cm in. Position it slightly off-centre so the steam creates a circular, whirlpool motion in the pitcher.
Open the steam valve fully. You’ll hear a high-pitched hissing sound at first — this is the aerating phase where you’re introducing air into the milk. Keep the tip just at the surface for 3–5 seconds until the milk volume increases slightly.
Then lower the pitcher slightly so the steam tip is deeper in the milk (about 2–3 cm down) and focus on spinning the milk rather than adding more air. This is the texturing phase — you’re folding the foam into the milk to create that smooth, integrated texture.
Stop when the bottom of the pitcher feels hot to the touch — not scalding, just hot. That’s roughly 60–65°C. Going beyond this temperature breaks down the natural sweetness of the milk and makes the foam less stable.
Without a steam wand:
Use a handheld electric frother. Heat the milk separately to about 60°C on the stove (test with your palm held near the surface — it should feel very warm but not steaming aggressively). Then froth vigorously with the handheld frother for 20–30 seconds, keeping the tip near the surface to incorporate air.
The texture won’t be as smooth as steam-wanded milk, but it’s workable — especially for a simple heart shape.
After steaming, tap the pitcher firmly on the counter two or three times to pop any large surface bubbles, then swirl the milk in circular motions for about 10 seconds. The surface should look glossy and smooth when it’s ready.
Step 3: The Pour — How Latte Art Actually Works
This is the part that intimidates people, and it’s also the part that becomes surprisingly intuitive once you’ve done it a few times.
Hold the cup with the espresso at a slight tilt toward you — about 20–30 degrees. This creates a pool for the milk to flow into and gives you a wider surface to work with.
Start pouring the milk from a height — about 8–10 cm above the cup. At this height, the milk cuts through the crema and mixes into the espresso underneath. You’ll see the liquid level rising but no visible white design yet. This is exactly right — you’re filling the cup, not drawing yet.
When the cup is about two-thirds full, lower the pitcher spout close to the surface — almost touching the liquid — and slow your pour. At this point the foam, being lighter than the liquid milk, will start to float on the surface and you’ll see white beginning to appear.
For a simple heart:
Once you see white on the surface, gently wiggle the pitcher from side to side (small movements, 1–2 cm each way) while continuing to pour slowly. You’ll see a white circle growing on the surface.
When that circle is about the size you want for the top of the heart, draw the pitcher straight forward through the centre of the circle toward the far edge of the cup in one smooth, quick motion. This cuts through the white blob and creates the two lobes of the heart with a pointed base.
That’s the heart. It takes most people about ten to fifteen tries before it looks clean, but the movement itself is simple once you’ve done it a few times.
For a rosette (slightly more advanced):
Start the same way — fill most of the cup from height, then lower the spout close to the surface. Instead of holding the pitcher still while you wiggle, move it slowly backward (toward yourself) while wiggling left and right. The foam will lay down in a series of arcs.
When you’ve created enough arcs, draw the pitcher forward through the centre without wiggling — the same finishing stroke as the heart. This creates the stem of the rosette and ties the pattern together.
The Coffee Art Needle — For Etched Designs
The Homepixi pitcher comes with a coffee art needle included, which opens up a completely different style of latte art that doesn’t require precise pouring technique.
Pour a flat white or latte without trying to create a pattern — just a clean, smooth milk surface. Then use the needle to draw designs by dragging through the foam. You can make:
- A simple spider web (pour concentric circles with chocolate sauce, drag the needle outward from the centre)
- A leaf or fern shape (use the needle tip to draw veins through a foam blob)
- Faces, flowers, or geometric patterns by dragging the tip through the white foam
Etching is far more accessible for beginners and produces impressive results quickly. If you’re making coffee for guests and want something that looks professional without spending thirty minutes practicing pour technique, the needle is your best friend.
Common Problems and What’s Actually Causing Them
The milk foam disappears into the espresso instead of floating: The foam is too wet and liquid. You didn’t aerate long enough in the first phase of steaming. Add a few more seconds with the tip at the surface before texturing.
There are big bubbles all over the surface: You over-aerated — the tip was at the surface for too long. Tap the pitcher harder on the counter and swirl more aggressively to break them down.
The design disappears as soon as I finish pouring: The milk was too hot. Overheated milk produces unstable foam that collapses quickly. Stay under 65°C.
I can’t see any white pattern forming when I pour: You’re still pouring from too high. Lower the pitcher spout much closer to the surface — almost touching the liquid — before you try to create the design.
The heart looks like a blob: The finishing stroke was too slow. The line you draw through the centre of the circle needs to be one confident, smooth movement — not a slow drag.
Cleaning Your Pitcher After Every Use
This is a small thing that makes a large difference. Rinse the pitcher immediately after use — don’t let milk dry inside it. Dried milk leaves a film on the inside that affects the taste of subsequent coffees and is much harder to clean off.
A quick rinse with warm water right after use, followed by a proper wash with dish soap, is all you need. The 304 stainless steel of the Homepixi pitcher is dishwasher safe, though hand washing preserves the mirror finish longer.
Wipe the steam wand on your espresso machine immediately after steaming as well — dried milk on a steam wand is both unhygienic and clogs the tip over time.
Final Thoughts
Latte art at home is genuinely achievable — it just requires understanding what you’re trying to create rather than hoping it happens by accident. The right milk texture, the right pitcher, and a clear mental picture of the two or three movements involved will get you further in a week of practice than most people expect.
Start with the heart. Make ten in a row. Notice what changes between each one. The improvements will come quickly once you stop thinking of it as art and start thinking of it as a simple set of physical movements done in a specific order.
And when you nail that first clean heart — which you will — it genuinely does make the coffee taste better. That’s not your imagination. It’s just the satisfaction of making something properly.
Shop the Homepixi Milk Frothing Pitcher — available in 350ml and 600ml sizes, 304 stainless steel, engraved measurement markings, precision pour spout, and coffee art needle included. Available on Homepixi.com and Amazon India.
faq’s
Yes, but with some limitations. A stovetop moka pot gives you a strong, concentrated coffee that can support simple latte art like a basic heart — the main difference is that moka pot coffee has very little crema compared to true espresso, so the contrast between the dark coffee and white foam is less defined. For etched designs using the coffee art needle, a moka pot works perfectly fine since you’re drawing on the foam surface rather than pouring into crema. If you want clean, well-defined pour art consistently, an espresso machine with a proper steam wand gives you the most control and the best results.
It depends on what you’re making most often. The 350ml Homepixi pitcher is ideal for a single cappuccino or a small, concentrated latte — it gives you a tighter, denser foam that works well for stronger drinks. The 600ml pitcher is better suited for standard lattes, flat whites, and situations where you’re making two drinks back to back, as it gives you more room to swirl and texture the milk properly without the foam climbing to the rim. For most home setups where you’re making one or two coffees a day, the 600ml is the more versatile option. Both sizes come with engraved measurement markings and the coffee art needle included.
This almost always comes down to milk texture — the foam wasn’t thick and integrated enough before pouring. There are two common causes. First, the milk was over-heated — anything above 65°C breaks down the protein structure that keeps foam stable, causing it to collapse quickly once poured. Second, the aeration phase was too short — you need a few seconds with the steam wand tip at the surface of the milk before going deeper to texture. After steaming, tap the pitcher firmly on the counter two or three times and swirl the milk for about ten seconds. If the surface looks glossy and paint-like with no visible large bubbles, it’s ready to pour and will float properly on the espresso
Rinse the pitcher with warm water immediately after every use — don’t let milk sit and dry inside it, as dried milk leaves a film that’s hard to remove and affects the taste of future coffees. A quick rinse right after use followed by a proper wash with dish soap and a soft sponge is all you need for daily cleaning. The Homepixi pitcher is made from 304 stainless steel, which is dishwasher safe, though hand washing preserves the mirror finish for longer. The engraved measurement markings won’t fade with regular washing — they’re etched into the steel, not printed on. For the steam wand on your espresso machine, wipe it with a damp cloth immediately after steaming every single time — dried milk on the wand is both unhygienic and clogs the tip over time.