
Meal prep with vacuum sealer roll is quickly becoming the go-to trick for Indian home cooks who are tired of watching their Sunday effort turn into Wednesday’s soggy, sad leftovers. If you’ve ever opened the fridge on a Thursday to find your marinated paneer dried out at the edges, your dal gone watery, or your dhania wilted into a slimy clump, you already know why regular containers and cling film just don’t cut it for a full week of Indian cooking.
The problem isn’t your cooking — it’s your storage. Indian meals are moisture-rich and spice-heavy, which makes them far more prone to oxidation, sogginess, and that dreaded “fridge smell” than a simple sandwich or salad. That’s exactly where a vacuum sealer roll changes the game.
Why Vacuum Sealing Works Better for Indian Food
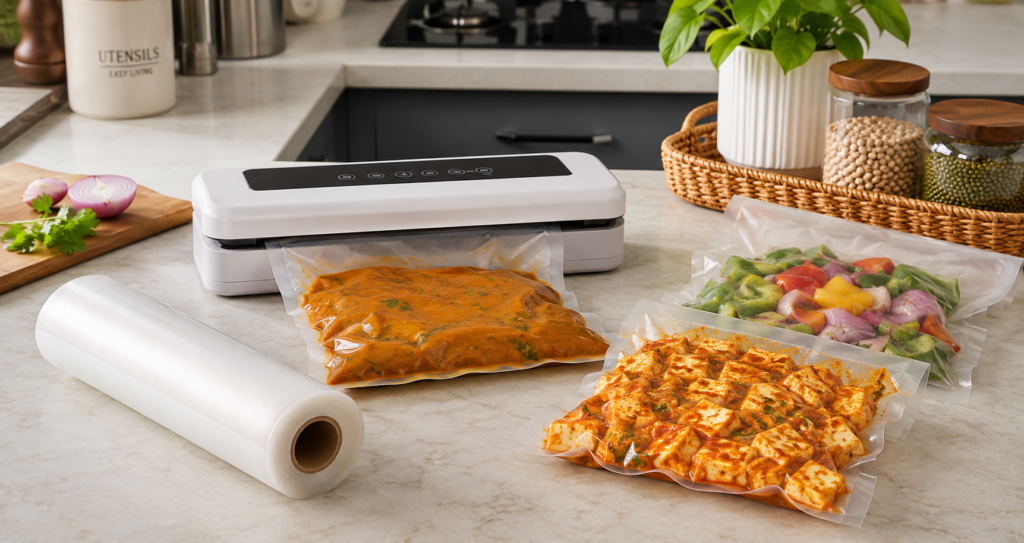
Most storage containers just trap air inside with the food. A vacuum sealer roll does the opposite — it pulls the air out completely before sealing, which slows down the two biggest culprits behind stale food: oxidation and moisture loss.
Here’s what that means practically for your kitchen:
- No more dried-out marinades. Air exposure is what causes tikka or curry marinades to dry unevenly at the edges while staying wet in the middle.
- Herbs and vegetables last longer. Chopped coriander, curry leaves, and green chillies stay fresher for days instead of wilting overnight.
- No cross-contamination of smells. Your fridge can hold six different masalas side by side without everything tasting like everything else.
- Custom-sized bags. You cut exactly the length you need from the roll, unlike pre-made pouches that waste space or don’t fit your portion.
If you’re serious about meal prep with vacuum sealer roll techniques, this single shift in storage method solves most of the problems Indian home cooks run into during batch cooking.
Planning Your Week Before You Start Sealing
A successful meal prep with vacuum sealer roll routine starts before you even touch the sealer. Jumping straight into cooking without a plan is the most common reason meal prep fails halfway through the week.
Before you begin, map out:
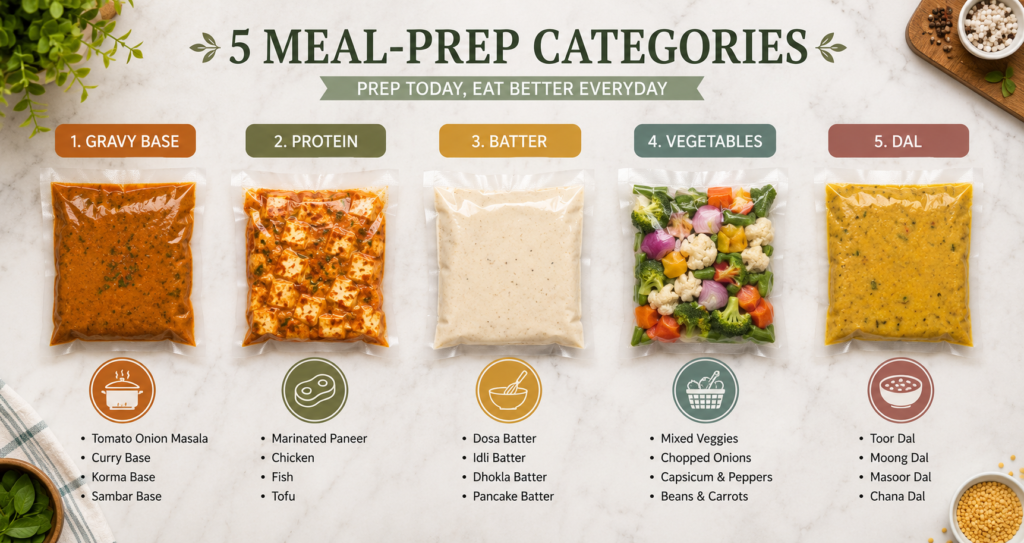
- 2–3 base gravies — onion-tomato base, palak base, or a coconut-based curry base.
- 2 marinated proteins — think paneer tikka, chicken, or tofu.
- 1–2 batters — idli, dosa, or besan chilla batter.
- Chopped vegetables for quick stir-fries and sabzis.
- A cooked dal or legume — rajma, chole, or moong dal.
When your meals share common bases, you spend less time cooking mid-week and more time simply reheating and assembling. This is the real secret behind efficient Indian meal prep.
Step-by-Step: Prepping Before You Seal
1. Marinated Proteins
Marinate your paneer, chicken, or tofu as usual, then portion it into flat, single-layer packs before sealing. Flat packs freeze faster and thaw more evenly, so you avoid that annoying icy center with a thawed edge.
2. Curry and Gravy Bases
Cook your onion-tomato or coconut-based gravies without the final tempering (tadka). Always let the gravy cool completely to room temperature before sealing — sealing hot food traps steam inside the bag and can encourage bacterial growth.
3. Batters
Idli, dosa, or chilla batter can be portioned into meal-sized bags. Leave a little extra headspace, since batter tends to expand slightly as it sits or ferments further.
4. Chopped Vegetables and Herbs
Wash and dry everything thoroughly before chopping. Moisture is the real enemy here; even a small amount of leftover water will get pulled out during vacuum sealing and can turn your vegetables mushy. Pat dry with a clean kitchen towel first.
5. Cooked Dal, Rajma, or Chole
Cool completely, then portion by meal size rather than by the size of the pot. This way, you only open what you need for that day.
Cutting, Filling, and Sealing the Right Way
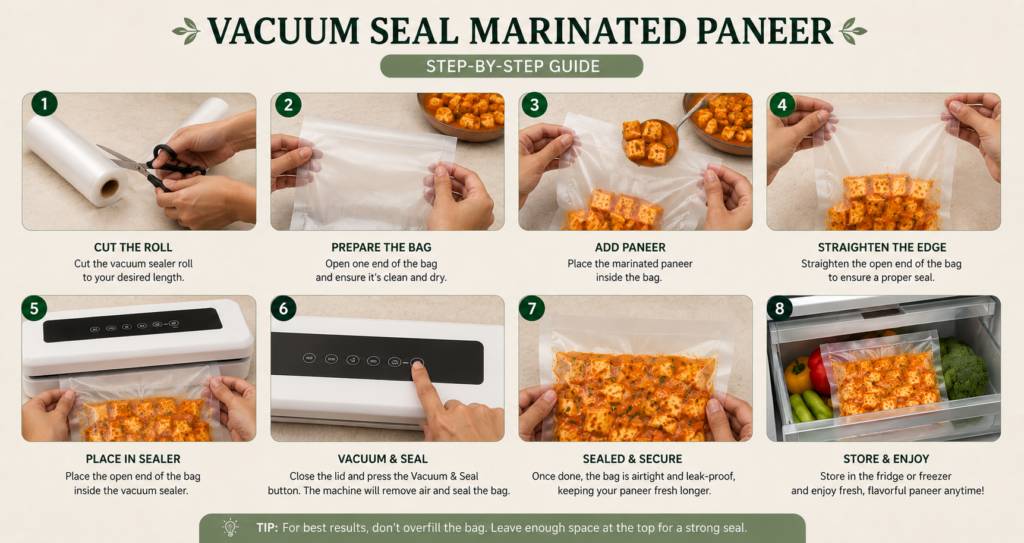
A vacuum sealer roll gives you far more flexibility than pre-made bags because you control the exact size for each dish. A few tips that make a real difference:
- Leave 3–4 inches of empty roll above the food line so the sealer has enough room to grip and seal properly.
- Keep the open end dry and grease-free — any curry stain or moisture on the sealing edge weakens the seal.
- Portion by meal, not by batch, so you only open what you’re eating that day.
- Label each bag with the dish name and date, since frozen gravies can look surprisingly similar.
- Lay bags flat in the freezer until solid, then stack them upright like files to save space.
Storage Guide: Fridge vs. Freezer
Here’s a quick reference for how long sealed Indian dishes typically stay fresh:
| Food Type | Fridge (Sealed) | Freezer (Sealed) |
|---|---|---|
| Marinated protein | 2–3 days | Up to 2 months |
| Curry/gravy base (no tempering) | 3–4 days | Up to 6 weeks |
| Cooked dal/legumes | 3–4 days | Up to 6 weeks |
| Idli/dosa batter | 3–4 days | Not recommended |
| Chopped vegetables | 2–3 days | Up to 3 weeks (blanch first) |
| Cooked rotis/parathas | 3–4 days | Up to 1 month |
Keep in mind that vacuum sealing extends shelf life by slowing oxidation, but it doesn’t replace basic food safety habits. Always cool food before sealing, and avoid leaving sealed food at room temperature for long periods.
Reheating Without Losing Texture
- Gravies and dals: Snip a corner of the bag and empty directly into a pan — no need to thaw first.
- Marinated proteins: Thaw overnight in the fridge for even cooking, especially for tandoori-style dishes.
- Batters: Thaw in the fridge, then rest at room temperature for 20–30 minutes before cooking.
- Rotis/parathas: Reheat directly on a tawa straight from the fridge.
A Sample Weekly Prep Plan
- Sunday: Prepare onion-tomato gravy base, marinated paneer tikka, chopped vegetables, cooked rajma, and dosa batter.
- Monday–Tuesday: Paneer tikka with stir-fried vegetables.
- Wednesday–Thursday: Rajma with rice, dosa for breakfast.
- Friday: Use the leftover gravy base for a quick vegetable curry.
That’s six meals from a single afternoon of cooking, each one sealed, labeled, and ready to go.
FAq
Start by cooling all cooked food to room temperature, then portion it by single meal size before sealing. This keeps each pack airtight and ready to reheat without exposing the rest to air.
Yes, but skip the final tempering (tadka) before sealing, and add it fresh after reheating for the best flavor and aroma.
No. Always let food cool completely before sealing. Sealing hot food traps steam inside the bag, which can encourage bacterial growth.
It’s not recommended, since freezing can affect the fermentation and texture of the batter. Sealed refrigeration for 3–4 days works much better.